10 best ways to free up hard drive space on Windows 10
Is your computer running low in space? If so, here are 10 practical ways to quickly free up space on Windows 10.
Windows 10 includes several options to free up space when the hard drive on your device fills up. Although drives with multiple terabytes are common on laptops and desktop computers, it does not take a long time to stuff them up with documents, pictures, videos, apps, and games. And then, without warning, you will start noticing slow performance, problems saving files, and many other issues.
If your device is running low on space, Windows 10 offers several tools (such as Storage Sense, OneDrive File On-demand, Compact OS, NTFS compression, and many others) to delete junk and temporary files, apps, and games to optimize the device storage. Using these tools will help you reclaim additional space, but it will improve the overall performance and problems during updates.
In this Windows 10 guide, we'll walk you through the best tips to free up storage space on your device to make room to store more files and install feature updates without issues.
1. Free up space by emptying Recycle Bin on Windows 10
On Windows 10, when deleting files, the system does not erase them from the hard drive. Instead, they are placed inside the Recycle Bin in case you need them back. However, depending on how the feature is configured, over time, the Recycle Bin can take a lot of space, which means that emptying the bin is one of the first actions you should take to regain valuable storage space.
To empty the Recycle Bin to free up space on Windows 10, use these steps:
- 1.Open Start.
2.Search for Recycle Bin and click the top result to open the app.
A quick tip: If the app does not appear in the result, you can open File Explorer (Windows key + E), and then type Recycle Bin and press Enter in the address bar.
- 3.Click the Recycle Bin Tools tab.
4.Click the Empty Recycle Bin button.
- 5.Click the Yes button.
Once you complete the steps, the system will free up around ten percent of the drive capacity (assuming the Recycle Bin is at capacity).
2. Free up space deleting junk files using Storage Sense on Windows 10
On Windows 10, Storage Sense is a feature that allows you to quickly delete junk files (including previous installation files after an upgrade and temporary files) to free up space on the primary and secondary drives to make room to store other files and improve drive efficiency.
Enable Storage Sense
Although you can use Storage Sense manually, you can also enable the feature to run maintenance automatically to prevent running out of space quickly.
To set up Storage Sense to run automatically, use these steps:
- Open Settings.
- Click on System.
- Click on Storage.
- Under the "Storage" section, click the Configure Storage Sense or run it now option.
5.Turn on the Storage Sense toggle switch.
6.Use the "Run Storage Sense" drop-down menu and select the best option for your situation:
- Every day.
- Every week.
- Every month.
- During low free disk space (recommended).
Once you complete the steps, Storage Sense will run automatically at the schedule you specified.
The option to enable the feature is also available on the Storage page, but using this option only activates the default settings. Using the Storage Sense settings page allows you to configure how the feature should remove unnecessary content.
Delete unnecessary files using Storage Sense
To free up space using Storage Sense, use these steps:
- Open Settings.
- Click on System.
- Click on Storage.
- Under the "Storage" section, click the Configure Storage Sense or run it now option.

5.Under the "Temporary Files" section, check the Delete temporary files that my apps aren't using the option.
6.Use the Recycle Bin drop-down menu to specify how to clear already deleted files you do not need.
7.Use the Downloads drop-down menu to specify how to clean up files you downloaded from the internet.
A quick tip: If you need to delete the most files, use the 1-day option. The Downloads folder may contain valuable files you may have downloaded from the internet, which means that it is recommended to backup those files manually before running Storage Sense.
8.Under the "Locally available cloud content" section, use the drop-down menu to specify how long OneDrive content synced to the device becomes online-only.
Quick note: This option is part of OneDrive Files On-Demand that allows you to access your documents, pictures, videos, and other files using File Explorer, without the need to sync them to reduce the space usage on your device. When your computer is low on space, you can use it to make files only available in the cloud. You will still see your files, but their content will only download when you need them.
9.Under the "Free up space now" section, check the Delete previous versions of Windows option (if applicable).
Quick note: If this option is available, you may be able to free up close to 20GB of space.
10.Click the Clean now button.
Storage Sense will run and delete unnecessary files from the computer to reclaim more space after you complete the steps.
Delete temporary files with Storage Sense
Storage Sense also allows you to delete temporary system and apps files to reclaim several gigabytes of space.
To delete temporary files with the Settings app, use these steps:
- Open Settings.
- Click on System.
- Click on Storage.
- Under the "Local Disk (C:)" section, click the item of the Temporary file. (If the item is not available, click the Show more categories option.)
5.Check all the items you want to remove to optimize the space. For example:
- Downloads.
- Windows Update Cleanup.
- Recycle Bin.
- Delivery Optimization Files.
- Thumbnails.
- Microsoft Defender Antivirus.
- Temporary Internet Files.
- Temporary files.
- Windows error reports and feedback diagnostics.
- DirectX Shader Cache.
- Previous Windows installation(s).
- Temporary Windows installation files.
- A quick tip: The available items may vary in your installation. If you want to select the Downloads item, before clearing these files, make sure to understand that this option will erase everything in the "Downloads" folder.
6.Click the Remove files button.

After you complete the steps, the files you selected will be deleted permanently, freeing up space for more important files.
View storage usage on Windows 10
While you are probably aware that your device is running low on space, Storage Sense can also help you understand which contents are using the most space to know the files you want to clean up.
To view the storage usage on Windows 10, use these steps:
- Open Settings.
- Click on System.
- Click on Storage.
- Under the "Local Disk C:" section, click the Show more categories option.
5.See how the storage is being utilized.
6.Select each category to see even more details and actions you can take to free up space on Windows 10.
Once you complete the steps, you will better understand the storage usage and the areas of focus to free up space.
For instance, by clicking the System & reserved category, you will see how much space the installation is using, and how much space virtual memory, hibernation files, system restore, and the amount of space the system is reserving for updates.
3. Free up space deleting temp files using Disk Cleanup on Windows 10
If Storage Sense is not for you, it is still possible to free up space using the legacy Disk Cleanup tool.
Remove temporary files with Disk Cleanup
To delete temporary files using Disk Cleanup, use these steps:
- Open Start.
- Search for Disk Cleanup and select the top result to open the feature.
- Use the "Drives" drop-down menu and select the (C:) drive (if applicable).
- Click the OK button.
Click the Clean up system files button.

- Use the "Drives" drop-down menu and select the (C:) drive.
- Click the OK button.
Check all the contents you want to clear. For example:
- Windows Update Cleanup.
- Microsoft Defender Antivirus.
- Downloaded Program Files.
- Temporary Internet Files.
- Windows error reports and feedback diagnostics.
- DirectX Shader Cache.
- Delivery Optimization Files.
- Device driver packages.
- Language Resource Files.
- Previous Windows installation(s).
- Recycle Bin.
- Temporary files.
- Thumbnails.
Click the OK button.
- Click the Delete Files button.
Once you complete the steps, those unnecessary files will be removed from the computer to freeing up hard drive space.
Delete System Restore and Shadow Copies using Disk Cleanup
If you use System Restore and the Shadow Copies feature, you can also delete older files to reclaim additional space.
To delete old system restore points on Windows 10, use these steps:
1.Open Start.
2.Search for Disk Cleanup and select the top result to open the feature.
3.Use the "Drives" drop-down menu and select the (C:) drive (if applicable).
4.Click the OK button.
5.Click the Cleanup system files button.6.Click the More Options tab.7.Under the "System Restore and Shadow Copies" section, click the Cleanup button.
8.Click the Delete button.
After you complete the steps, you will reclaim some additional space to store more important files.
4. Free up space using OneDrive files on-demand on Windows 10
If you need to free up space immediately (and every megabyte counts), you can use the OneDrive files on-demand feature to make files available online only manually.
Enable OneDrive Files On-Demand
On Windows 10, the Files On-Demand feature should be already enabled in OneDrive, but if it is not, use these steps:
1.Click the OneDrive icon in the bottom-right corner of the taskbar.
2.Click the Help & Settings option.
3.Click the Settings option.

4.Click the Settings tab.
5.Under the "File On-Demand" section, check the Save space and download files as you use the option.
6.Click the OK button.
Once you complete the steps, you can move files to the OneDrive folder and make them available only online to free up space (see steps below).
Convert local files available only-online
To make files available online-only, use these steps:
1.Open File Explorer.
2.Select the OneDrive folder from the left pane.
3.Select the files and folders taking up space.
A quick tip: You can select all files using the Ctrl + A keyboard shortcut; selecting the first file, holding down the Shift key and selecting the last files, or holding down the Ctrl key and selecting each file individually.
4.Right-click the selection and choose the Free up space option.

In addition to making synced files available only with an internet connection, you can free up even more space by moving other files to the OneDrive folder and use the above steps to make them available on-demand.
After you complete the steps, you will be able to access all of your content using File Explorer, but you will only be able to open them with an internet connection.
The free version of OneDrive only allows you to store up to 5GB of data. However, you can always get a Microsoft 365 subscription to lift the limit to 1TB. In addition to the 1TB of storage, the subscription also gives you access to all the Office apps and services like Microsoft Teams and Family Safety.
Get subscribed
5. Free up space by uninstalling non-essential apps and games
Another effective way to reclaim storage space is to uninstall apps you no longer need or rarely use. Games also require a lot of space, which means that keeping your catalog to a minimum can significantly reduce space usage while improving gaming performance at the same time.
To uninstall apps and games on Windows 10, use these steps:
1.Open Settings.
2.Click on Apps.
3.Click on Apps & features.
4.Use the "Sort by" filter and select the Size view to identify the apps and games using the most space quickly.
5.Select the item you want to remove.
6.Click the Uninstall button.
7.Click the Uninstall button again.
8.Continue with the on-screen directions (if applicable).
Once you complete the steps, repeat the same instructions to remove additional apps and games from your device.
If you have previously enabled the Windows Subsystem for Linux, you may also have one or multiple distros still installed on your computer. You can always uninstall them to free up space on Windows 10.
Delete unused languages
Secondary languages can also use some of the available space. If you are not using the other languages, you can remove them to make more room for additional files.
To uninstall languages on Windows 10, use these steps:
1.Open Settings.
2.Click on Time & Language.
3.Click on Language.
4.Select the language no longer needed.
5Click the Remove button.

After you complete the steps, you may need to repeat the instructions to delete additional languages.
Delete maps
If you are using the maps feature built into Windows 10, you can remove the offline maps to clear up some additional space.
To remove locally stored maps, use these steps:
1.Open Settings.
2.Click on Apps.
3.Click on Offline maps.
4.Click the Delete all maps button.

5.Click the Delete all button.
Once you complete the steps, the offline maps will be removed to make more space available on your device.
Uninstall optional features
If you have optional features (such as Windows Media Player, Windows Hello Face, Math Recognizer, Windows Fax and Scan, and others) installed on your computer, you can remove them to regain some extra space.
To remove optional features, use these steps:
1.Open Settings.
2.Click on Apps.
3.Click on Apps & features.
4.Under the "Apps & features" section, click the Optional features option.

5.Click the "Sort by" menu and select the Install Size option to find the feature using the most space.
6.Select the feature.
7.Click the Uninstall button.
After you complete the steps, you may need to repeat the instructions to remove other features you may no longer need.
6. Free up space using NTFS compression
Alternatively, you can also use the built-in lightweight feature part of the NT File System (NTFS) to reduce the storage usage of current files maintaining normal access without the need to zip your files. The feature is available to compress files, folders, or the entire drive.
Important: Using data compression can negatively impact system performance because it has to compress and decompress data on the fly. You should use this option only if you do not have another option or have capable hardware.
Enable folder compression
To enable Windows 10 NTFS compression for a folder, use these steps:
1.Open File Explorer.
2.Browse to the folder you want to compress.
3.Right-click the folder and select the Properties option.
4.Click the Advanced button.

5.Under the "Compressor Encrypt attributes" section, check the Compress contents to save the disk space option.
6.Click the OK button.

7.Click the Apply button.
8.Select the Apply changes to this folder, subfolders, and files option.
Quick note: If the folder already contains a lot of files, the initial compression can take some time.
9.Click the OK button.
10.Click the OK button again.
After you complete the steps, the file compression feature will enable in the folder, reducing the size of existing and future files you save in the location. (The above steps focus on folders, but the same instructions will apply to compress files individually.)
If you no longer want to use file compression, you can revert the changes using the same instructions, but on step No. 5, make sure to clear the Compress contents to save disk space option.
Enable drive compression
To enable Windows 10 NTFS compression for the entire drive, use these steps:
1.Open File Explorer.
2.Click on This PC from the left pane.
3.Under the "Devices and drives" section, right-click the drive you want to compress and select the Properties option.
4.Check the Compress this drive to save the disk space option.
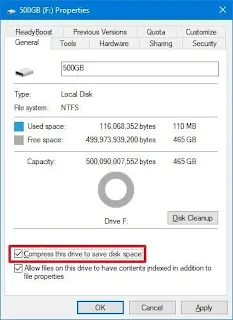
A quick tip: Since compressing the installation drive can negatively affect performance, try using this feature only on a secondary drive or partition.
5.Click the Apply button.
6.Select the Apply changes to drive (drive letter), subfolders, and files option.
A quick tip: If the hard drive already contains files, the initial compression process can take a long time.
7.Click the OK button.
8.Click the OK button again.
Once you complete the steps, the file system will compress the drive and any content already on the storage without reformatting.
When the feature is no longer needed, you can use the same instructions to disable compression, but on step No. 4, make sure to clear the Compress this drive to save disk space option.
7. Free up space disabling Hibernation on Windows 10
On Windows 10, Hibernation is a nifty feature that saves the data in memory onto the system drive before shutting down to preserve the current session. When the device comes back online, you can pick up where you left off.
Although it is a convenient feature, it requires many gigabytes of space to save the memory information into the hiberfil.sys file. If the device is running out of room, disabling Hibernation can help free up space for more critical files.
To disable Hibernation to free up space, use these steps:
Open Start.
Search for Command Prompt, right-click the top result, and select the Run as administrator option.
Type the following command to disable Hibernation and press Enter:
powercfg /hibernate off
Once you complete the steps, Hibernation will no longer be available, but you will have more space to store other files.
In the future, you can always re-enable the feature with the same instructions, but on step No. 3, make sure to use the powercfg /hibernate on command.
8. Free up space compressing installation footprint of Windows 10
Compact OS is a tool designed to compress and reduce the footprint of the Windows 10 installation and apps on devices with limited storage. However, anyone can use the tool to quickly reclaim a few gigabytes of space when you do not have external storage.
Warning: This is a friendly reminder that modifying system files are risky, and it can cause irreversible damage to your installation if you do not do it correctly. It is recommended to make a temporary full backup of your PC before proceeding.
To shrink the size of the Windows 10 installation and apps, use these steps:
1.Open Start.
2.Search for Command Prompt, right-click the top result, and select the Run as administrator option.
4.Type the following command to compress the installation of Windows 10 alongside apps and press Enter:
compact.exe /compactOS:always
After you complete the steps, the process will reclaim around 2GB of storage without affecting performance significantly.
When the feature is no longer needed, you can always revert the changes using the same instructions, but on step No. 3, make sure to use the compact.exe /compactOS: never command.
10. Free up space rebuilding search indexer on Windows 10
The Windows Search database can sometimes grow very large due to the amount of content or indexing issues, and it can be one of the reasons the system drive is running out of space. If this is the case, clearing and rebuilding the database and modifying the index items can significantly reclaim storage space.
To rebuild the index of Windows 10, use these steps:
1.Open Settings.
2.Click on Search.
3.Click on Searching Windows.
Under the "More Search Indexer Settings" section, click the Advanced Search 4.Indexer Settings option.
5.Click the Advanced button.

6.Click the Index Settings tab.
7.Under the "Troubleshooting" section, click the Rebuild button.

8.Click the OK button.
Once you complete the steps, Windows 10 will clear and rebuild the Windows Search feature's index database.
The only caveat is that during the rebuild, searches using the taskbar, File Explorer, and across the experience might be incomplete until files are re-indexed.
Configure indexer
You can also minimize the space that the database uses by preventing Windows Search from indexing specific locations.
To remove indexing locations from Windows Search, use these steps:
1.Open Settings.
2.Click on Search.
3.Click on Searching Windows.
4.Under the "More Search Indexer Settings" section, click the Advanced Search Indexer Settings option.
5.Click the Modify button.
6.Click the Show all locations button.
7.Clear the options for apps you want to exclude in the index.
Quick note: Usually, you do not want to index any kind of application.
8.Expand the C drive and clear the folder you do not wish to appear in search to reduce the database storage usage.
9.Click the OK button.
10.Click the Close button.
After you complete the steps, Windows Search will update the database, hopefully reducing its footprint.


![NaturalReader Pro Free Activation Key 2021 [Ultimate] Free Download](https://blogger.googleusercontent.com/img/b/R29vZ2xl/AVvXsEhfOINu7-x_LxJ2zWx5HWi6LW7W9DUOAKpR1srYYMus565xWm-UpX0qQVAx3gkpkq-XPtDG53meA5xyzzBxaLdhMdO5fOhtG3GgargVbp9sGEby2YjO_2DmIcmjiohiVMnQM6SG3wruDgg/s72-c/NaturalReader-15-Crack-With-Activation-Key-2017-Final-Free-Download-300x127.png "NaturalReader Pro Free Activation Key 2021 [Ultimate] Free Download")
 Live streaming setup || MHL - Capture Card supported smartphones list")


0 Comments: